
Heavy vehicle road safety on the South Eastern Freeway
Driving down the South Eastern Freeway needs extra road safety awareness, decision-making and actions. This is especially true for truck and bus drivers.
Truck and bus drivers should plan their travel down the South Eastern Freeway. The goal is to make sure they are familiar with the road and the safe driving requirements.
Why it is dangerous
The last 7 km of the South Eastern Freeway is a very long and steep descent. The gradient becomes less severe near the bottom of the freeway. However, it becomes steeper as it continues downhill through a major intersection and into an urban area.
Heavy vehicles cause more risk to other road users because they are heavy and rigid. Because of their momentum and mass, heavy vehicles take much longer to stop than lighter vehicles. These, together with speed, increases both the:
- risk of the vehicle being involved in a crash
- severity of the crash.
How to descend safely
Truck and bus drivers can descend safely if they:
- use the right safety techniques from the start of the descent at Crafers
- follow signs and traffic controls.
When descending the South Eastern Freeway, truck and bus drivers must:
- use low gear and appropriate engine braking
- reduce speed to a maximum 60 km/h, unless otherwise signed at a lower speed
- stay in the left lane between Crafers and Measdays Bridge.
If you’re not sure what the vehicle is classed as see definitions of a truck and bus.
Watch the video to help you prepare to drive down the South Eastern Freeway.
Use low gear and appropriate engine braking
Truck and bus drivers must both:
- use low gear and the appropriate engine brake before the Crafers Interchange
- stay in this gear to the bottom of the South Eastern Freeway.
When you control speed this way, you should not need to use the primary or foot brake, except for briefly to change gears.
In automatic trucks, lock the low gear in or switch to manual.
By law, truck and bus drivers must:
- use a gear that is low enough to enable the vehicle to be driven safely
- not rely on the primary brake as the only way to slow the speed of the vehicle on the descent.
Primary or foot brakes can easily overheat and lose their effectiveness. When this happens, drivers could lose control of their truck or bus. However, the intent of the low gear offence is not to completely prohibit the use of the primary brake. Drivers should use the primary brake if they need to.
Reduce speed
Trucks and buses must slow down to no more than 60 km/h from Crafers interchange to the bottom of the South Eastern Freeway. If there are signs showing a lower speed limit, they must follow the lower limit.
60 km/h is the maximum speed a truck or bus can travel on the South Eastern Freeway down-track. The appropriate speed for specific vehicles may be lower, such as for a heavy-laden truck.
To maintain safe travel, speeds may be further reduced below 60 km/h at any time via:
- the variable speed limit signs
- other temporary speed limit signs.
A further reduced speed limit may be due to bad weather, reduced visibility or an incident, such as a crash or roadworks.
Stay in the left lane
Trucks and buses must stay in the left lane and not overtake between Crafers and the Measdays Bridge exit ramp.
Outside of this area, trucks and buses can overtake if they do both of the following:
- They stay in low gear.
- They do not exceed 60 km/h.
Safety ramps
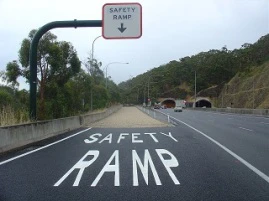
Use a safety ramp if you lose control or have doubts about arriving at the major intersection safely.
Trucks and buses are encouraged to use safety ramps when they need to.
We don't charge trucks or buses a fee for using the safety ramps. We cover the costs of towing heavy vehicles out of the safety ramp.
Location of safety ramps
There are two signed safety ramps on the left side of the South Eastern Freeway between Crafers and Adelaide.
The safety ramps are located at both:
- just before the entrance to the Heysen Tunnels
- just past the Mt Osmond Interchange.
While the road flattens out on the approach to the second and last safety ramp, it then falls away again. The temporary flatter section of road may lead drivers to incorrectly think they will be able to regain control of their speed.
Truck or bus drivers who are not in full control of their vehicle must not try to “ride it out” to the major intersection at the bottom of the hill. Otherwise, they will risk serious injury or death to themselves and other road users.
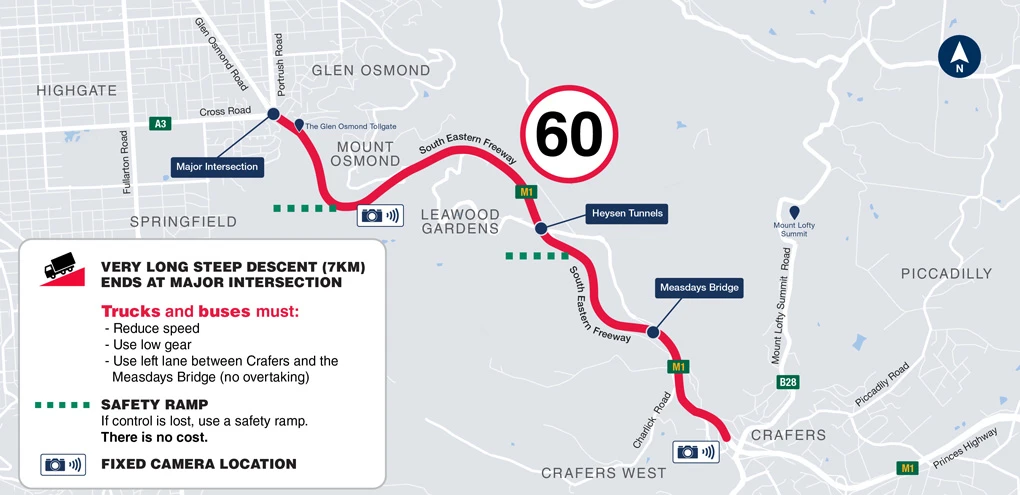
Map description for screen readers: This map shows safety information for driving down the South Eastern Freeway from Mount Osmond towards Adelaide. The route is highlighted in red. It starts near Glen Osmond and continues down a long, steep 7-kilometre descent that ends at a major intersection. A distinct warning advises: 'Very long steep descent (7 kilometres) ends at major intersection.'
There are special instructions for trucks and buses. These are: 'Reduce speed', 'Use low gear', and 'Use left lane between Crafers and the Measdays Bridge (no overtaking)'. The location of a safety ramp is shown with a dashed line and text: 'If control is lost, use a safety ramp. There is no cost.'
Two camera icons mark where fixed camera locations are along the route. Key suburbs shown include Glen Osmond, Highgate, Springfield, Leawood Gardens, Mount Osmond, Heysen Tunnels, Measdays Bridge, Crafers and Crafers West.
The map also shows major roads intersecting or connected to the freeway. For example, Glen Osmond Road, Cross Road, Fullarton Road, Portrush Road, Mount Lofty Summit Road, Piccadilly Road and Charlick Road. The map shows the speed limit as 60 km/h. A compass rose indicates north.
The map emphasises safe driving practices on this downhill stretch of the South Eastern Freeway.
How to use a safety ramp
Safety ramps help to safely stop a speeding truck or bus. They are the best and safest option for all road users if the truck or bus driver has lost control.
There are signs marking the distance to the safety ramps to give the driver time to prepare. Pavement markings are also there to show which lane to use.
The main stopping force in a safety ramp is the drag caused as the vehicle sinks gently into a bed of gravel. The effect on the driver is less than the use of emergency braking. The stopping force of the gravel:
- should not cause injury to the driver
- is unlikely to cause damage to the vehicle.
Removing a vehicle from the safety ramp
We need to use a tow truck to remove a vehicle from a safety ramp.
There is no cost to remove a truck or bus from a safety ramp. Safety for all drivers is our main priority.
Drivers must either:
- contact us with the emergency phone at the safety ramp
- phone the Traffic Management Centre on 1800 018 313.
Visual aid for the South Eastern Freeway descent
Use our visual aid to see key features along the South Eastern Freeway descent, from Crafers to the Glen Osmond intersection.
It helps heavy vehicle drivers find identify key landmarks and safety features along the descent.
Download the visual aid for the Southern Eastern Freeway descent (PDF, 22.8 MB).
Before you drive on the freeway
Companies and drivers should make sure:
- drivers have done appropriate training
- drivers have a thorough understanding about safe driving on steep descents
- the truck or bus is roadworthy
- the brakes and engine brake are functioning properly.
The maximum speed limit for all other vehicles is 90 km/h, unless otherwise signed. Drivers should always drive according to the road conditions.
Signage along the freeway
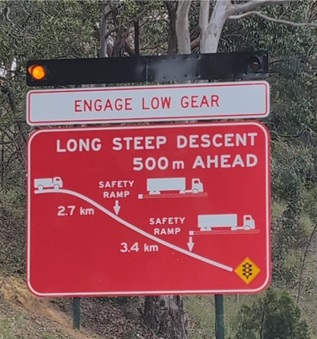
Signs are on the lead up to the South Eastern Freeway down-track to alert drivers about the upcoming descent. They provide directions to drivers on descending safely and show where the safety ramps are.
These signs, as well as speed limit and low gear signs, apply to drivers of trucks and buses. If you’re not sure what the vehicle is classed as see definitions of a truck and bus.
Penalties apply for truck and bus drivers who do not follow the safe descent laws. See applicable offences and penalties.
Heavy vehicle inspections
The National Heavy Vehicle Regulator (NHVR) undertake heavy vehicle compliance activities in several locations including Monteith on the Princes Highway.
While other agencies also share these sites, they are mainly used by the NHVR and SA Police to conduct off-road intercepts and inspections. This is part of ensuring safe heavy vehicle operation and compliance.
When the variable message signs show that 'Trucks and buses must enter', all buses and trucks with a Gross Vehicle Mass (GVM) more than 4.5 tonnes must enter these sites. Failing to enter the checking station when directed or disobeying the sign may result in a fine.
To help drivers prepare to enter, variable message signs are located:
- 400 metres before the checking station
- just before the checking station.
All motorists should be aware that the posted speed limit will be decreased to 80 km/h when the checking station is open and enforced.
Monteith checking station

The Monteith site has two checking stations on either side of the Princes Highway. NHVR and SA Police use these facilities to intercept and inspect heavy vehicles travelling into and out of Adelaide, mainly via the South Eastern Freeway.
This site is used for a range of heavy vehicle safety and regulatory activities. These include:
- roadworthiness and vehicle standards inspections
- mass and dimensional limits compliance
- compliance with heavy vehicle driver fatigue and related work/rest requirements
- ensuring safe vehicle loading and suitable load restraint
- registration and driver licensing checks.
The Monteith checking station has a five-plate weighbridge that can weigh large combinations in a single weigh.
Heysen Tunnels
The height clearance for the Heysen Tunnels is 4.9 metres and over-height warning signs are on both side of the Heysen Tunnels.
A laser beam height detector checks the height of vehicles going towards the Heysen Tunnels. If the vehicle is too high to drive through the Tunnels safely, the over-height warning sign will flash. The flash directs the driver to stop in the stopping lane on the left of the road.
The height detector will automatically send us an alert. We also use cameras to confirm if the vehicle is over-height. When confirmed, we will request police or emergency services to help the driver to turn the vehicle around through a dedicated break in the median strip.
Drivers can also contact us by using:
- the emergency phones located near the Heysen Tunnels
- their own phone to call the Traffic Management Centre on 1800 018 313.
Each tunnel:
- is 480 metres long
- is 10.5 metres wide, with vehicles up to 4.0m wide permitted to travel
- has three lanes, each lane 3.5 metres wide
- has a height clearance of 4.9 metres
- has emergency phones
- has broadcast radio and mobile phone coverage
- is connected by three emergency cross passages to the other tunnel.
Related information
- Laws, offences and penalties
Learn about the applicable laws and related penalties to the South Eastern Freeway down-track.